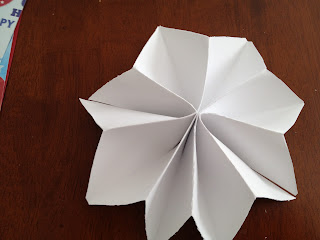
So, I was getting out my decorations for Independence Day. That's when I realized my collection of decorations for this upcoming holiday is dismal at best. I had two things! How did I let this happen? So, I started perusing Pinterest to see what I could do about this. There was a tutorial I had pinned to make 3D stars into a garland. I also, came up with something of my own as well.
Here is what I did:
1. cut scrapbook paper into 6in x 11in pieces.
2. Fold a piece of paper in half (hamburger style).
3. Fold in the same direction 2 more times.
4. Unfold and then use the fold lines as guides to fold accordion style making sure to press folds firmly.
5. Staple the middle perpendicular to the folded edge.
6. Measure 1 inch from each short edge. Cut from the folded side diagonally to the opposite corner.
7. Unfold and tape or staple ends together.
8. You can be done here, or apply a layer of Mod Podge to make it a little more sturdy and shiny!
9. Instead of threading ribbon through the points to make a garland, I superglued the stars onto a wreath circle that I had wrapped in ribbon.
(after step 6 it should look like this)
(step 7)
(Step 8)
The finished product! I think it would look good with some holiday themed ribbon coming off in random directions from all around the wreath. However, I live in a town that didn't have stores with cool ribbon like this and I was too cheap to add anymore. Maybe another year.
Okay, so here is the thing I came up with on my own. I've seen a lot of things similar to this, but I decided to just make my own. I bought everything for this project for about $5 because everything was on sale!
The items I used were some very cheap 5x7 wood frames, cheap wooden letters, scrapbook paper, ribbon, paint, and a drill and small screws.
1. I drilled 2 holes into each frame. One on top and one on bottom.
2. Drilled holes into the backs of the letters so I could attach each letter to the frame with screw.
3. Paint the frames and letters.
4. Cut scrapbook paper to fit into the frames.
5. assemble the frames together with the paper and letters.
6. Thread ribbon through holes to attach the frames to each other.
Finished product! I thought it turned out really well. I may cover it with Mod Podge to help protect it from the elements.


